How I Built My Personal Site with Jekyll and Minimal Mistakes - Part 3: Publishing Takeaways and Final Thoughts
Edit 2025-08-28: This three-part series describes the original design of my site, which has since changed. However, the techniques and features presented remain useful for Jekyll development, so I’m keeping it here for future reference.
Introduction
This is the third and final part of a three-post series, where I sum up the journey of building my website. If you haven’t, make sure to read Part 1: Setup and Design Decisions and Part 2: Custom Implementation and Plugins. In this part, the site will finally go live! I will share a useful checklist for pre- and post-publishing, based on my experiences, and we will conclude the series with my final thoughts.
Publishing
At this point, I have implemented what I planned for a minimum viable product (MVP). I have also created one initial post in each of my sub-blogs, so my site was ready to go public.
gh-pages deploy branch
Since I cannot use GHP directly to build my site, I have to build it locally, and push it to a separate branch. I set it up this way.
1. Create an orphan branch called gh-pages.
git checkout --orphan gh-pages
git rm -rf .   # Clean working directory
echo "My site is published here" > index.html
git add index.html
git commit -m "Initial gh-pages commit"
git push origin gh-pages
git checkout main  # Go back to your main branch
An orphan branch means that it has no commit history when created. It is like starting a brand new repository inside the existing one. It is useful, because the gh-pages deployment branch will contain the built site and needs nothing else from the main branch. That’s why the second command cleans the working directory to prevent adding all the existing files to gh-pages.
2. Set GitHub Pages to use the gh-pages branch
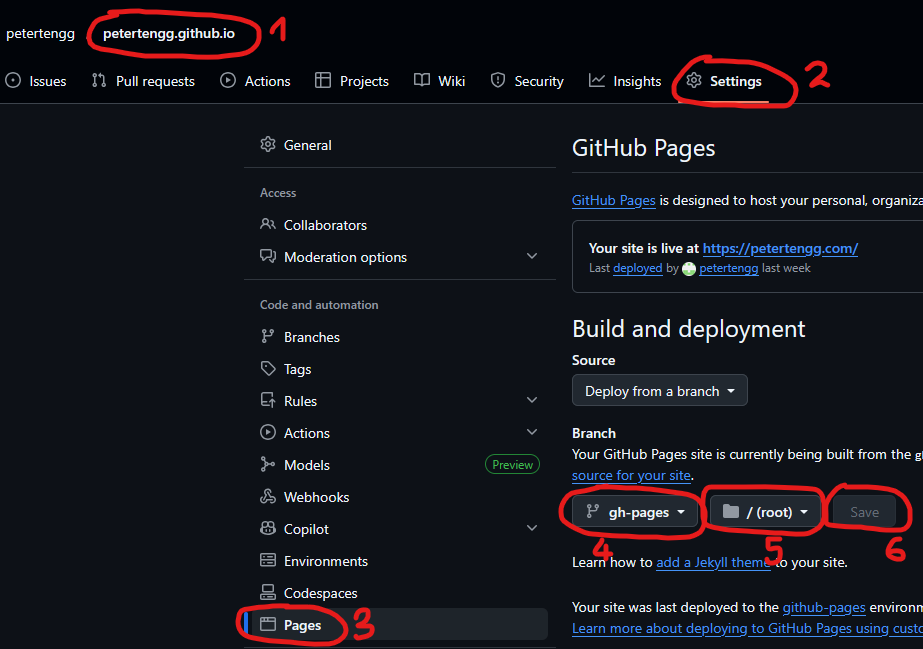
- Go to your repo on
GitHub -> Settings -> Pages - Source: Select
gh-pagesbranch,/(root) - Save.
3. Publishing the website. These are the steps you need to carry out every time you want to publish.
3.1. Build your site locally.
bundle exec jekyll build
This will generate the site under the _site folder.
3.2. Copy _site contents to gh-pages branch
git worktree add ../_deploy gh-pages
This has to be done only once at the initial setup. It is a subdirectory clone trick. _deploy won’t be physically inside your working folder, but will be a sibling to it, keeping gh-pages in a separate working tree at ../_deploy, which avoids messy branch switching.
3.3. Then:
rm -rf ../_deploy/*
cp -r _site/* ../_deploy/
cd ../_deploy
git add .
git commit -m "Publish site"
git push origin gh-pages
cd -
That’s it. Your site is now pushed to the deploy branch on your GitHub repo. If all went well, GitHub Pages should begin building your site automatically and soon it will be publicly available under {your_repo_name}.github.io. In my case petertengg.github.io.
3.4. Finally, if it works, you can put these steps together into a reusable deploy script. This is optional, but I love automating, so here is the script I use:
# Set Jekyll to production environment
JEKYLL_ENV=production bundle exec jekyll build

# Continue deployment steps
rm -rf ../_deploy/*
cp -r _site/* ../_deploy/
cd ../_deploy
git add .
git commit -m "Publish site"
git push origin gh-pages
cd -
I set JEKYLL_ENV=production, because it is needed for the comment section to be displayed by Minimal Mistakes.
Whenever I publish my site, I just run:
./deploy.sh
Publishing experiences and checklist
In this section, I will sum up my experiences launching my site. In general, it went quite smoothly without major issues (not that the risk was very high :P), but I want to remember some takeaways for the next time.
Key takeaways
- It was a good idea to do a “soft” launch one day before the “official” launch.
- “soft” launch: I shared the link with my friends and family asking for feedback. This caught smaller issues and got some improvement ideas for the future.
- “official” launch: one day later I announced my site on LinkedIn and Instagram
Checklist/steps to do when publishing
1. Build with JEKYLL_ENV=production and run locally (http://127.0.0.1:4000/)
1.1. Check desktop version in a browser.
1.1.1. If you have renamed any file, check for broken links
1.1.2. Click all new links on new pages/posts
1.2. Check how it looks in the mobile version (in Chrome: F12 -> Toggle Device Toolbar (or Ctrl + Shift + M))
2. Publish
2.1. Check live site on desktop.
2.2. Check live site on an actual mobile device.
2.3. Optional: ask feedback from friends.
2.4. Optional: announce new content on social media.
2.4.1. Start with your least important audience/platform.
2.4.2. Finish with the most important target audience.
After publishing
After my site has gone live, I have set up a couple of more things.
- I bought my
domainand set it up in GitHub Pages. Now my site is available at https://petertengg.com/ Google Search Console: helps monitor how your site appears in Google Search and fix indexing or SEO issues.Google Analytics: tracks and reports website traffic, showing how visitors interact with your site.
I mention them here just for the sake of completeness, but the details are out of the scope of this (already quite long) blog post. If you want me to cover them, let me know and I will be happy to do so.
Conclusion
I feel I have managed to set up a good framework for my further blogging endeavours. It was a relatively big initial investment, but it was totally worth it. I am really satisfied and proud of the result. I got to learn a lot about GitHub Pages, Jekyll and Minimal Mistakes. In hindsight, I am happy to have chosen this path and would do the same if I had to start over. The learning curve of this stack is relatively easy, I had a lot of fun building my site, and the result is satisfying. I also have the feeling that I haven’t reached the limits of this framework, it still offers plenty of room for future improvements. For now, however, I want to enjoy my site and focus on writing posts and publishing content.
Before this, I had very limited experience with web development, and it wasn’t exactly positive either. Jekyll may have been the gateway drug for me to web development. Who knows, maybe next time I will get into dynamic site development as well. But for now, I want to focus on my core areas: C++, (performance) optimisations and trading.
Before dropping the pen, I want to give a shoutout to Minimal Mistakes and its creator Michael Rose. MM proved to be a good choice, even though I don’t have much experience with other themes. Great experience, very well documented, flexible and a lot of fun to work with. Very happy with the outcome.
Links
- Part 1: Setup and Design Decisions
- Part 2: Custom Implementation and Plugins
- Portfolio entry
- GitHub repo
Comments